What is Infrared Obstacle Avoidance Sensor ? & How Does It Work?
Welcome, Developers & Engineers! We’re excited to have you here. This space is built for creators, problem-solvers, and tech enthusiasts like you. Whether you’re exploring projects, diving into code, or just visiting a site that speaks your language, you’re in the right place. In this blog, you will gain insightful knowledge of the Infrared Obstacle Avoidance Sensor Module. Moreover, understanding the basics of this sensor can greatly enhance your robotics and automation projects. So, let’s get started.
What is Infrared Obstacle Avoidance Sensor Module?
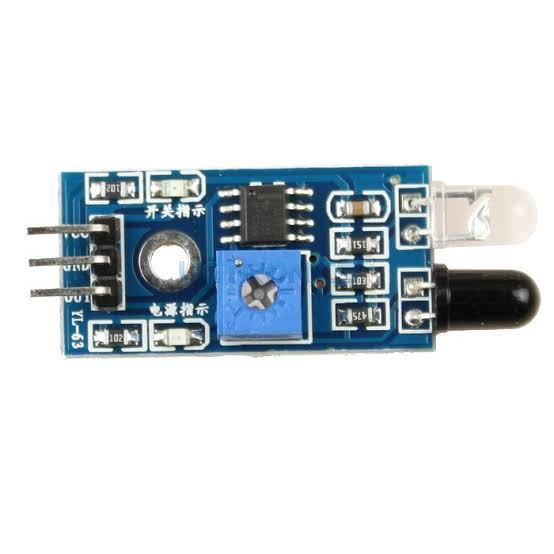
The Infrared Obstacle Avoidance Sensor Module (commonly known as FC-51 or KY-032) is a low-cost infrared proximity sensor that detects obstacles in front of it. Consequently, it is widely used in robotics projects to avoid collisions. This module features an IR transmitter and receiver pair along with a comparator circuit. Therefore, it provides a simple digital output, making it easy to interface with microcontrollers like Arduino, ESP32, or Raspberry Pi. Additionally, it includes a potentiometer to adjust the detection range.
Working Principles of Infrared Obstacle Avoidance Sensor Module?
Infrared Transmission
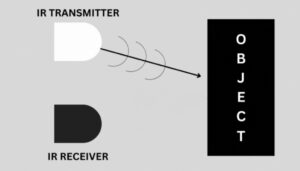
The IR LED continuously emits infrared light. This light is invisible to our eyes, but electronic components can detect it easily. Think of it as a “flashlight” that shines IR light straight ahead.
Infrared Reception
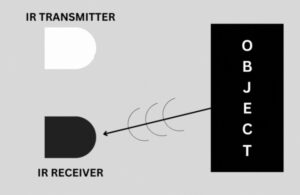
When the emitted IR light hits an object, some of it reflects back to the sensor. The photodiode or phototransistor detects this reflected IR light. If there is no object, very little light is reflected.
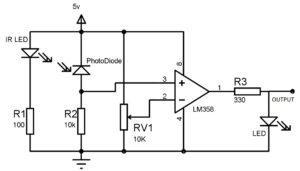
Signal Processing: Moreover, the onboard comparator circuit (often LM393) processes the receiver signal. If sufficient reflected IR is detected, the output goes LOW (obstacle present). Otherwise, it stays HIGH (no obstacle). Furthermore, an onboard LED lights up when an obstacle is detected.
Detection Adjustment: In addition, the built-in potentiometer adjusts sensitivity, allowing you to set the effective detection distance (typically 2-40 cm).
Hardware Overview of Infrared Obstacle Avoidance Sensor Module?
The module is a small board with an IR transmitter LED, IR receiver, comparator chip, potentiometer, and status LEDs.
Most versions (3-pin) are always enabled, while some (4-pin KY-032) have an EN pin and jumper for optional enabling. As a result, the module requires minimal external components.
Supporting Circuitry: Additionally, it includes a power LED and obstacle indicator LED for visual feedback. Consequently, it’s very beginner-friendly and needs only power and one digital pin for operation.
Technical Specifications of Infrared Obstacle Avoidance Sensor Module?
- Function: Digital obstacle/proximity detection.
- Output: Digital (HIGH/LOW), active low on obstacle detection.
- Sensor Type: Infrared reflective (IR LED + phototransistor).
- Detection Range: 2 cm to 40 cm (adjustable via potentiometer).
- Detection Angle: About 35°.
- Pinout: 3-pin (VCC, GND, OUT) or 4-pin (VCC, GND, OUT, EN).
- Operating Voltage: 3.3V to 5V DC.
- Current Consumption: ~20-30 mA.
- Output Level: TTL compatible (LOW when obstacle detected).
- Board Size: Approximately 3.2 cm x 1.4 cm.
Infrared Obstacle Avoidance Sensor Module Pinout?
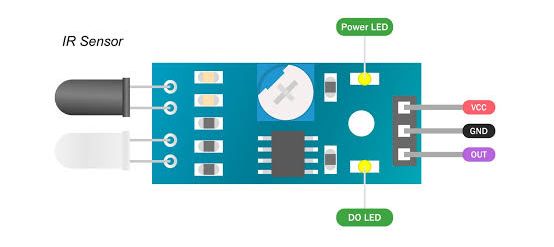
- VCC: Power supply (3.3V-5V)
- GND: Ground
- OUT: Digital output (LOW when obstacle detected)
- EN (on 4-pin versions): Enable pin (jumper usually present for always-on)
Basic Connections to Arduino:
- VCC: Connect to 5V or 3.3V on Arduino
- GND: Connect to Arduino GND
- OUT: Connect to any digital pin (e.g., pin 2)
Real Life Uses and Applications of Infrared Obstacle Avoidance Sensor Module?
This low-cost sensor is perfect for hobbyist robotics and educational projects requiring simple obstacle detection.
- Robot Obstacle Avoidance: Helps line-following or smart cars stop or turn away from walls/objects.
- Automated Doors/Gates: Detects approaching people or vehicles.
- Security Systems: Triggers alarms on intrusion detection.
- Conveyor Belt Monitoring: Counts items or detects jams.
- Anti-Drop Sensors: Prevents robots from falling off edges (on reflective surfaces).
- Hand Gesture Detection: Simple proximity sensing for interactive projects.
- Product Counters: Counts items passing on a production line.
Using Infrared Obstacle Avoidance Sensor Module with Arduino
In this part, we will learn how you can use this sensor with Arduino Uno, Nano, or Mega to detect obstacles in just a few minutes – even if you’re a beginner.
What You Need:
- Any Arduino board (Uno recommended)
- Infrared Obstacle Avoidance Sensor Module (FC-51/KY-032)
- Jumper wires
- Breadboard (optional)
Wiring Diagram:
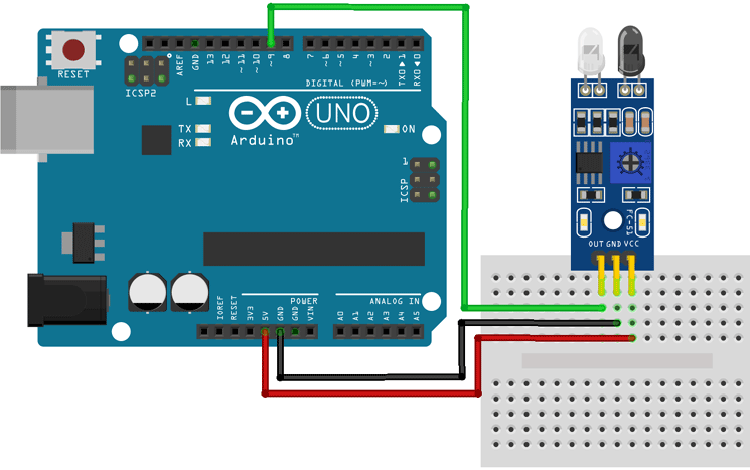
Connect directly – no extra components needed.
Code:
No special library is required – just use basic digitalRead(). Here’s a tested simple code – just copy-paste into your Arduino IDE.
int  obstaclePin = 9;        // This is our input pin
void setup()
{
  pinMode(obstaclePin, INPUT);
  Serial.begin(9600);
}
void loop()
{
  int hasObstacle = digitalRead(obstaclePin);

  if (hasObstacle == HIGH)

  {
    Serial.print( "Stop something is ahead!!  ");
    Serial.println(hasObstacle);
  }
  else
  {
    Serial.print("Path is clear  ");
    Serial.println(hasObstacle);
  }
  delay(1000);
}
Note: This is a basic example using standard Arduino functions – no external library needed.
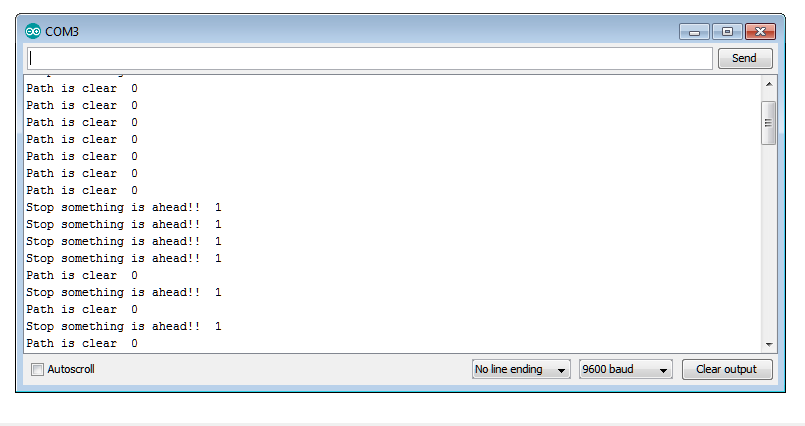
After uploading the code, open the Serial Monitor (Ctrl+Shift+M), set baud rate to 9600, and you’ll see messages like “Obstacle Detected!” or “No Obstacle” updating every half second. Place your hand or object in front of the sensor to test!
Note: Adjust the potentiometer for desired range. The sensor works best on reflective surfaces and may need tweaking in bright sunlight. Moreover, keep it away from other IR sources for reliable operation.
Wrapping up
In this post, we’ve covered all the fundamental aspects of the Infrared Obstacle Avoidance Sensor Module. We trust that the information provided has been clear and insightful. Feel free to ask any questions you may have about this topic in the comment section below. We are here to help and provide additional clarification as needed.