What is HC-SR501 PIR Sensor & How does it work ?

This is Riyad Munshi, just as a computer scientist optimizes code for efficiency on a computational grid, I am optimizing this blog post to deliver valuable information. So, fasten your seat belts as we navigate the pixels and data points of the digital canvas. In this post, I will let you know everything about the HC-SR501 PIR Sensor. Whether you’re hobbyist or a professional in this field, understanding the basics of the PIR Sensor can greatly enhance your projects and applications. So, let’s start your journey on my post.
What is HC-SR501 PIR Sensor?
HC-SR501 is widely used sensor module. PIR stands for Passive Infrared. This sensor utilizes infrared technology to detect motion or movement PIR sensors are commonly employed in various applications for motion detection.
The “HC” in HC-SR501 stands for “Hill Country,” the location of the Chinese company that produces these modules.
Working Principal of HC-SR501 PIR Sensor!
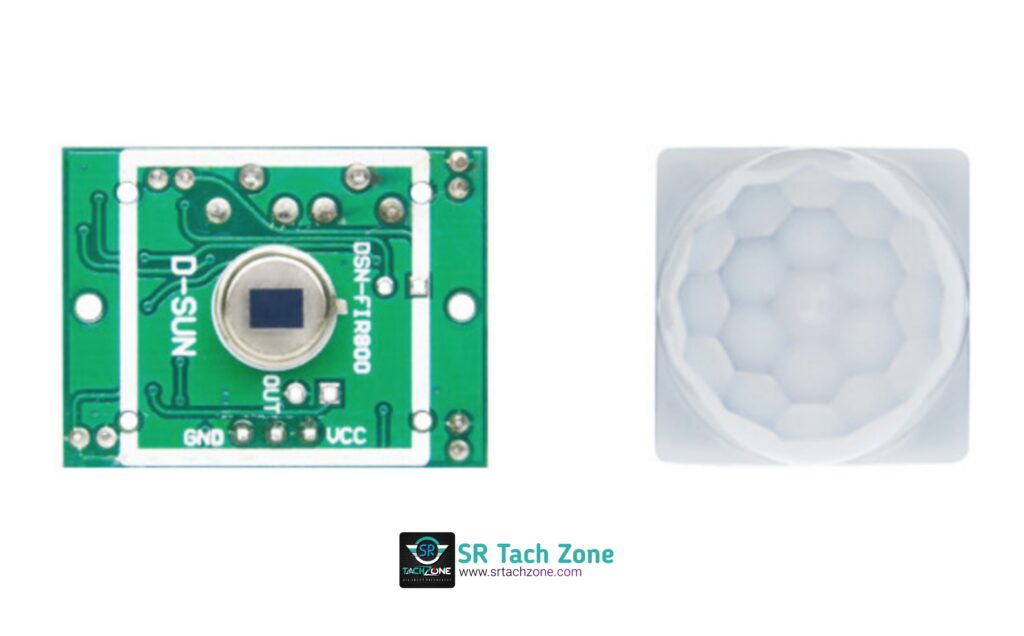
At first glance, the HC-SR501 Sensor appears like a small module, but it holds immense technological capabilities within its compact design. Let’s take a closer look of it’s workings.
Pyroelectric Sensor
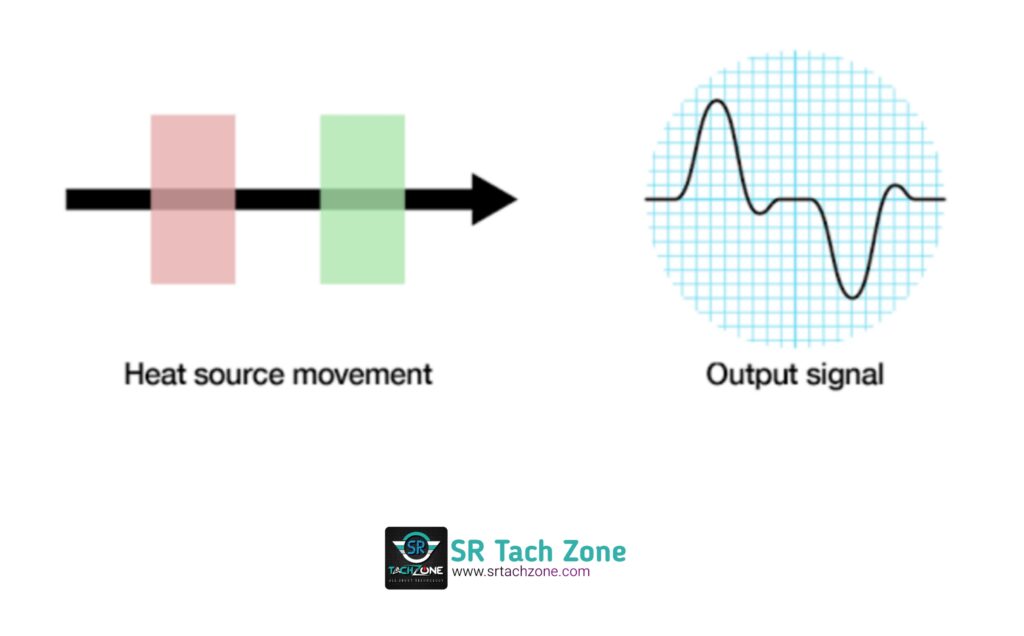
Inside the HC-SR501 PIR Sensor, there is a pyroelectric sensor. This sensor consists of a thin crystal line structure that possesses the unique property of generating electrical energy when exposed to rapid temperature changes. When an object, a person or anything moves within the sensor’s range, the pyroelectric sensor detects the fluctuation in infrared radiation. Then it’s trigger a response.
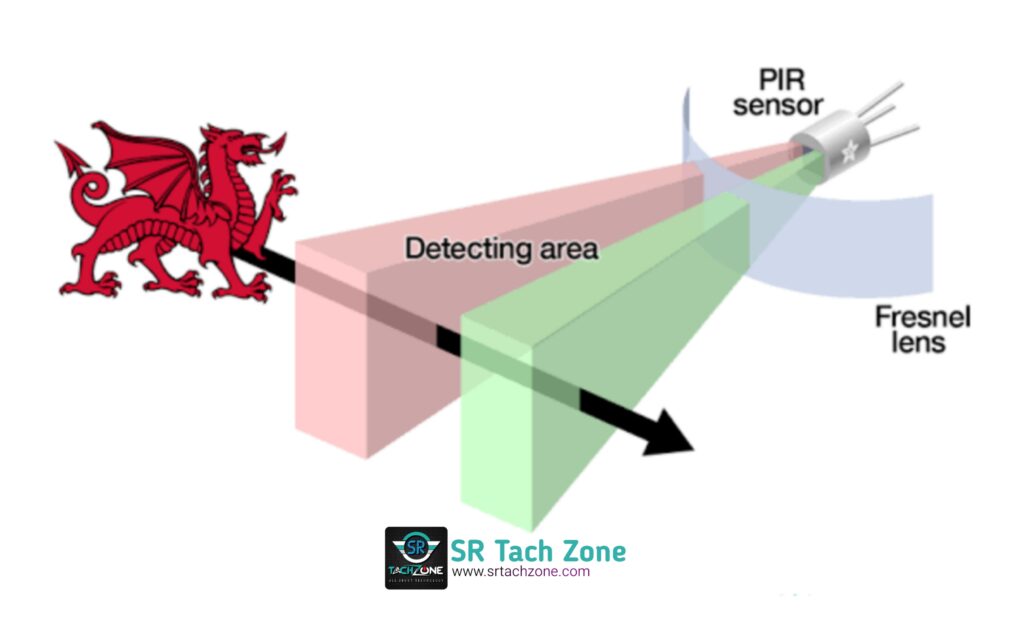
Infrared Detection
The HC-SR501 PIR Sensor contains a specialized lens. That’s Fresnel lens.
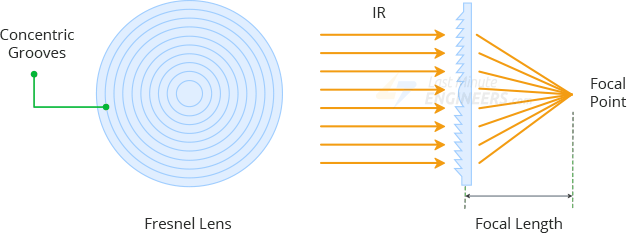
Fresnel lens is a type of compact lens that contain a series of concentric grooves or steps, enabling the lens to have a much thinner profile than a traditional lens. This design was developed by Augustin-Jean Fresnel (French physicist), in the early 19th century. The primary advantage of a Fresnel lens is its ability to provide optical performance comparable to a conventional lens but in a much lighter and more space-efficient form. The role of Fresnel Lens in HC-SR501 PIR Sensor the lens filters and focuses infrared radiation from its surroundings. This lens is sensitive to the human body’s heat signature, enabling the sensor to detect motion accurately.
Signal Processing
Once the pyroelectric sensor detects motion, it sends an electrical signals to the HC-SR501 sensor’s on-board microcontroller. This microcontroller analyzes and processes the received signals to determine the presence or of motion.
Hardware Overview of HC-SR501 PIR Sensor!
Depending on the sensor’s configuration, it can set to trigger a digital output when detecting motion. This output can easily interfaced with microcontrollers, development boards, or other electronic devices for further action or automation.
PIR Controller (BISS0001 IC)

The BISS0001 is specifically design for PIR sensors. It’s control the signals generat by the PIR sensor, and convert into a digital signal that can use with any micro controller like arduino or respberry pi.
Sensitivity Adjustment
HC-SR501 PIR Sensor has a potentiometer on the back to adjust the the maximum detection range. This can adjust over a range of approximately 3 meters to 7 meters .
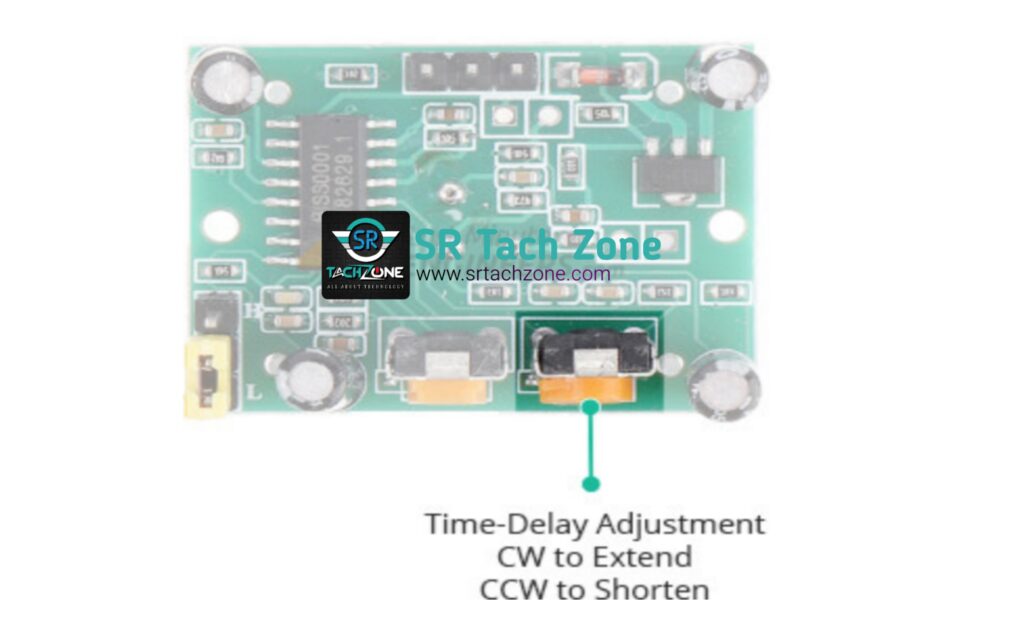
Time-Delay Adjustment
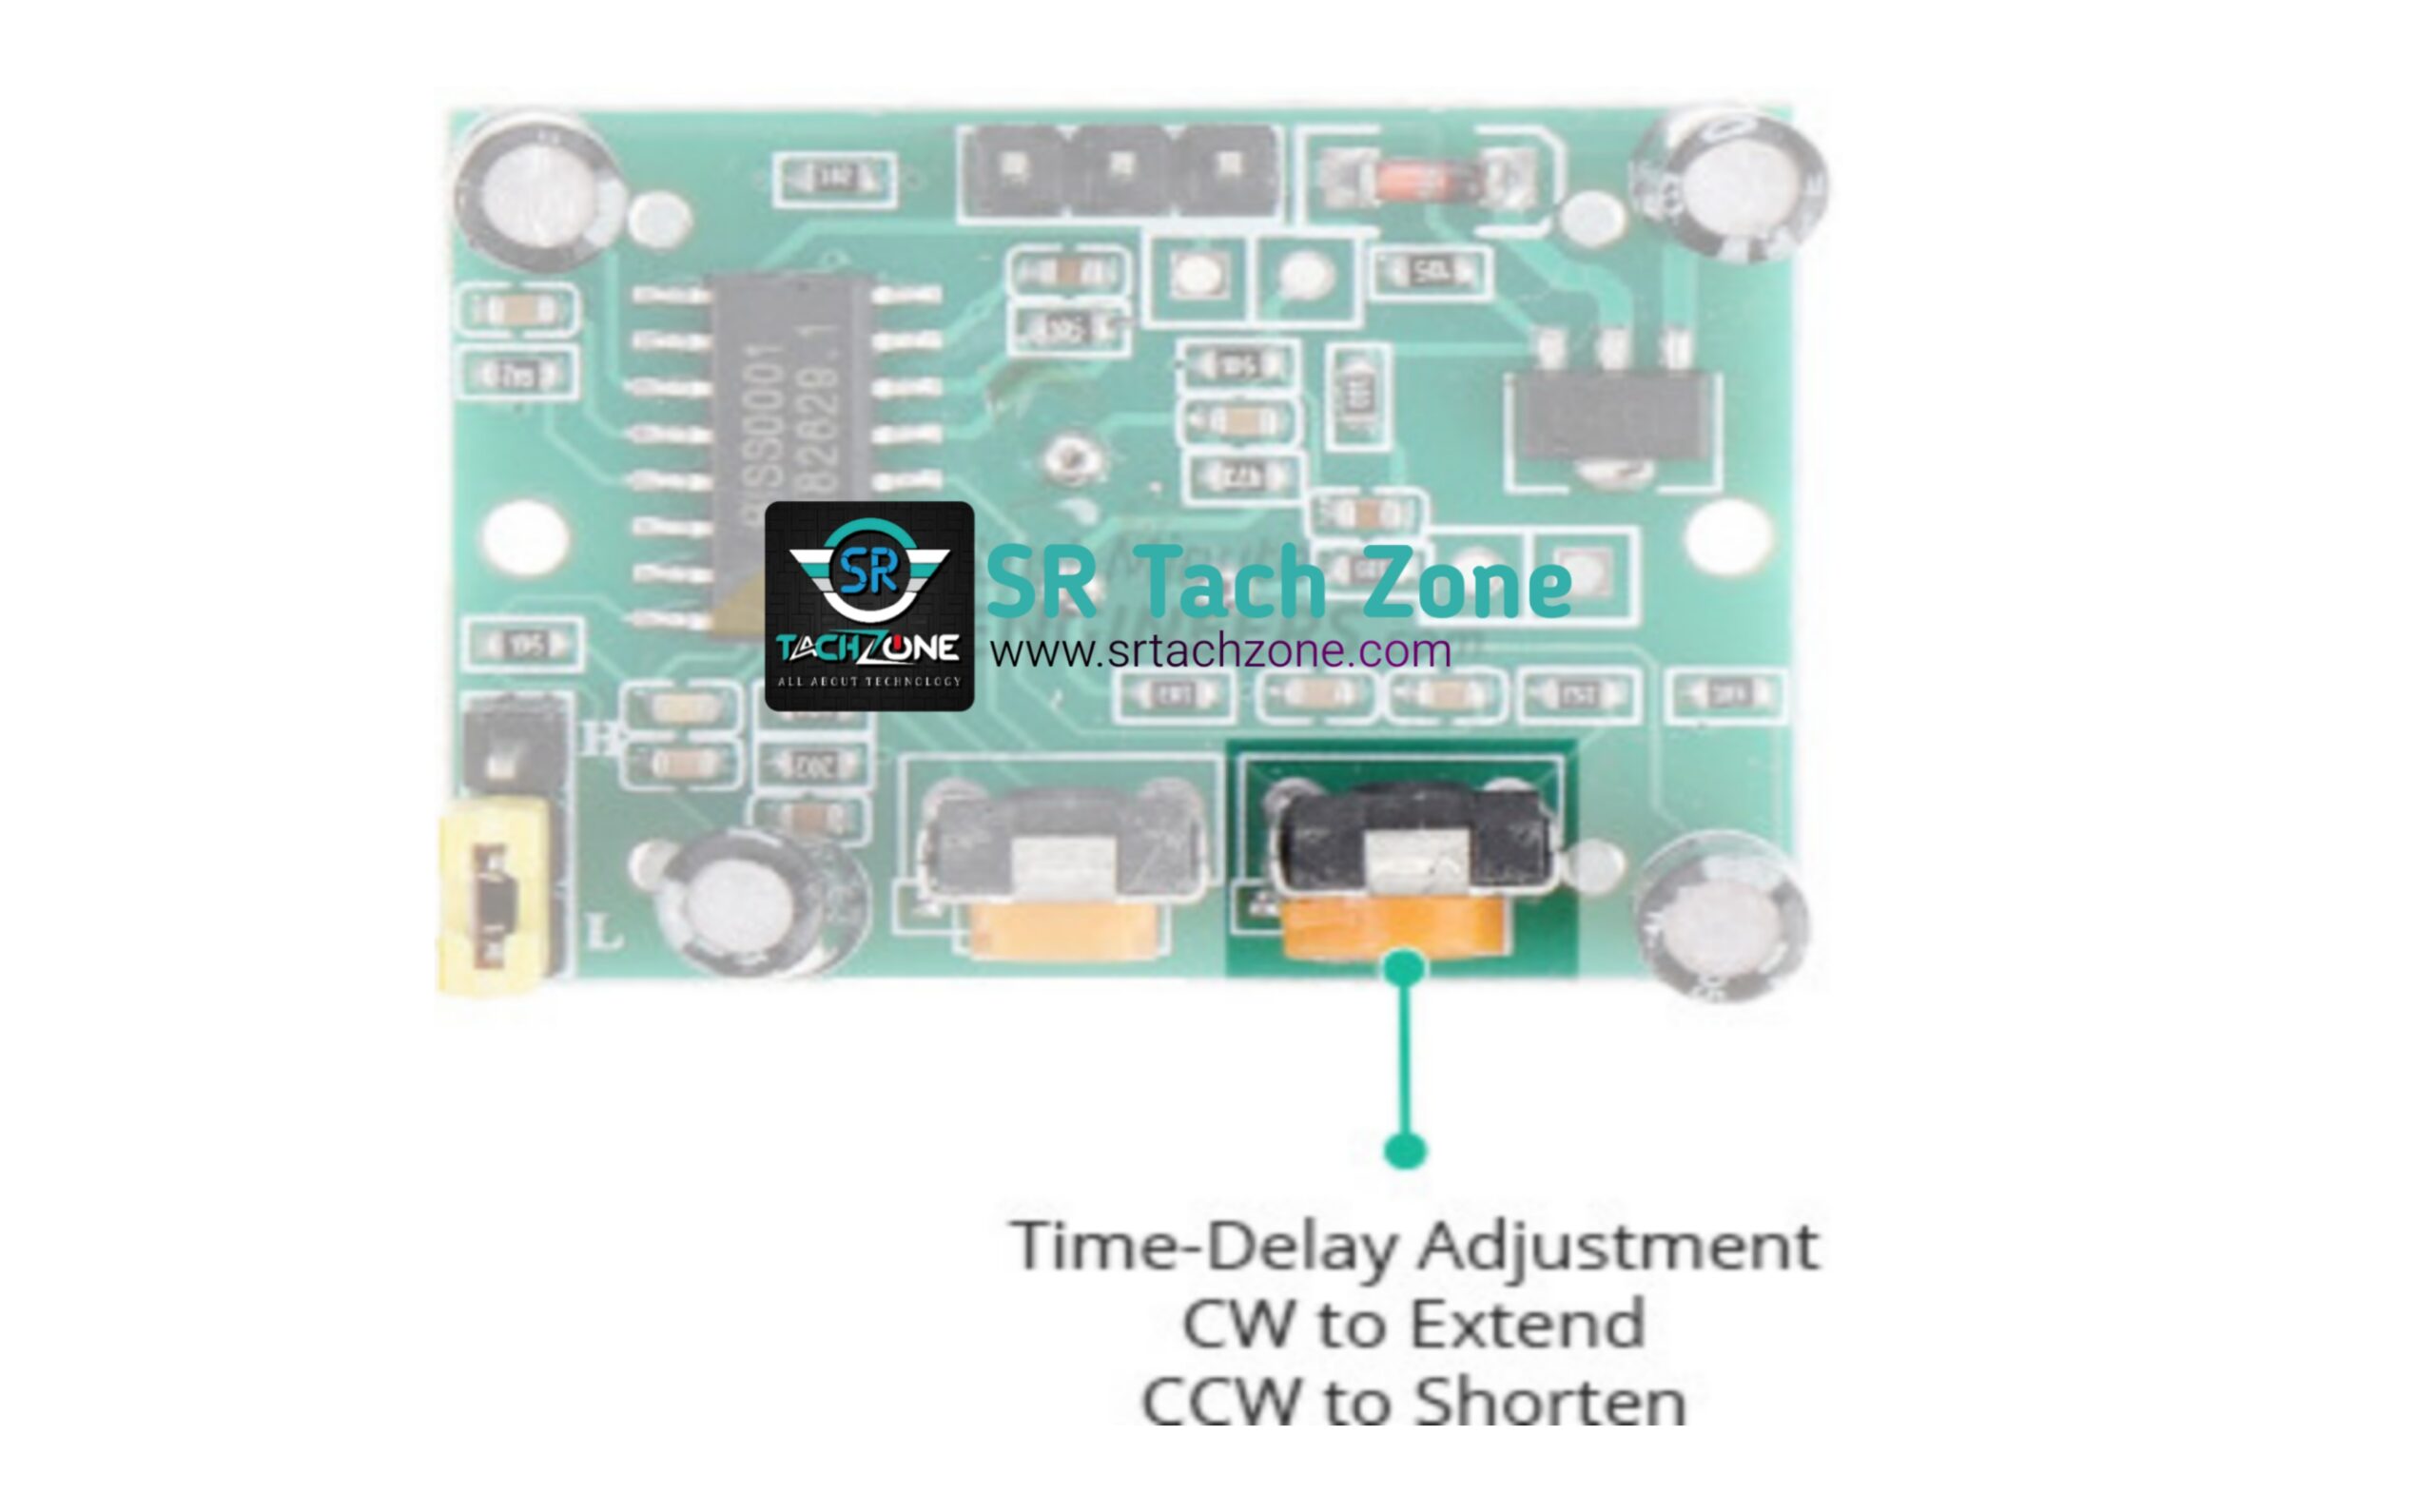
One more potentiometer on the back of the PIR sensor to adjust how long the output will remain HIGH after motion is detect. It can adjusted from 1 second to about 3 minutes.
Technical Specifications of HC-SR501 PIR Sensor
- Operating Voltage Range: 4.5V to 20V DC
- Recommended Operating Voltage: 5V DC
- Quiescent Current Consumption: <50µA
- Operational Current Consumption: 50mA
- Detection Distance Range: 3 to 7 meters
- Adjustable Sensing Range: Yes (via potentiometer)
- Time Delay Range Adjustment: 5 seconds to 300 seconds
- Delay Time Adjustable: Yes (via potentiometer)
- Trigger Modes: Repeatable (Default) and Non-repeatable
- Trigger Mode Selectable: Yes (via jumper)
- Output Signal Level: High (3.3V or 5V) when motion is detected
- Output Signal Duration: Corresponds to the time delay setting
- Sensitivity: Adjustable (via potentiometer)
- Default Sensitivity: Medium
- Operating Temperature Range: -15°C to +70°C
- Dimensions Module Size: Approximately 32mm x 24mm
- Dimensions Lens Size: Approximately 23mm x 24mm
- Pyroelectric Sensor: Dual-element, rectangular
- Pyroelectric Sensor Spectral Response: 8-14µm
- Lens Material: Fresnel Lens
- Default Output Duration: Around 1.2 seconds
HC-SR501 PIR Sensor Pinout

- VCC (Power): Connect this pin to the positive power supply voltage. The typical operating voltage is 5V, but the sensor can often handle a voltage range from 4.5V to 20V.
- OUT (Output): This pin provides the digital output signal. When motion is detected, the output goes high (3.3V or 5V, depending on the operating voltage). Connect this pin to a microcontroller or other digital input device for further processing.
- GND (Ground): Connect this pin to the ground of the power supply.
Uses and Application of HC-SR501 PIR Sensor
The HC-SR501 PIR Sensor finds applications in various demands, thanks to its exceptional motion detection capabilities. Here are some notable uses.
- Home Security Systems: With its ability to detect human presence, the HC-SR501 PIR Sensor is a valuable component in home security systems. It can trigger alarms, turn on lights, or activate surveillance cameras when any movements is detected.
- Energy Efficiency: HC-SR501 PIR Sensors contribute to energy conservation by automatically controlling lighting and electrical appliances. In offices or conference rooms, the sensor can detect occupancy and adjust lighting levels accordingly, reducing unnecessary power consumption.
- Automatic Door Systems: In high-traffic areas like malls, hospitals, or airports, HC-SR501 PIR Sensors play a vital role in automatic door systems. When someone approaches an entrance, the sensor detects and triggers the door to open.
Using HC-SR501 PIR Sensor with Arduino
Using HC-SR501 PIR (Passive Infrared) Sensor with Arduino is a common and straight forward task as it is widely employed for motion detection in various Arduino projects. Here how I’m connect and use an HC-SR501 PIR Sensor with Arduino.
Wiring HC-SR501 PIR Sensor with Arduino

- Connect VCC (Sensor) to 5V (Arduino)
- Connect GND (Sensor) to GND (Arduino)
- Connect OUT (Sensor) to a Digital Pin (Arduino)
Arduino Code:
Now, I’m writing a basic Arduino code to read the PIR sensor’s output on serial monitor
/*
Project:  Using HC-SR501 PIR Sensor with Arduino
Full Project Link: https://srtachzone.com/what-is-hc-sr501-pir-sensor-how-does-it-work/
*/
// Define the pin to which the PIR sensor OUT pin is connected
const int pirSensorPin = 2;

void setup() {
  // Initialize the serial communication
  Serial.begin(9600);

  // Set the PIR sensor pin as INPUT
  pinMode(pirSensorPin, INPUT);
}

void loop() {
  // Read the PIR sensor output
  int motionDetected = digitalRead(pirSensorPin);

  // Print the result to the Serial Monitor
  if (motionDetected == HIGH) {
    Serial.println("Motion detected!");
    // Add your code here for actions to be taken when motion is detected
  } else {
    Serial.println("No motion detected");
  }

  // Delay for a short time to avoid rapid multiple detections
  delay(500);
}
Instructions for you
Upload the code to your Arduino board. Open the Serial Monitor in the Arduino IDE (Tools -> Serial Monitor). Observe the output in the Serial Monitor. It will indicate whether motion is detected or not.
This basic setup can be expanded for more complex projects, such as controlling lights, alarms, or other devices based on motion detection.
Wrapping up
In this Post we have clear all fundamentals of HC-SR501 PIR Sensor. I hope you understand. Ask me any Question on this topic in the comment box.


My brother recommended I may like this web site.
He was totally right. This put up truly made my day.
You can not consider just how a lot time I had spent for
this information! Thank you!
you are always welcome on our web side
Discover countless interesting and valuable resources on this site .
Whether you’re into detailed tutorials to quick tips , you’ll find for everyone .
Enhance your knowledge with curated resources crafted to inspire and support you .
Here provides an intuitive navigation to help you access resources right away.
Connect with of a growing community and appreciate reliable content regularly .
Freight delivery from China is dependable and efficient.
Our company provides tailored solutions for businesses of any scale.
We take care of all shipping processes to make your operations uninterrupted.
shipping of cargo from china by air
With regular shipments, we secure timely arrival of your orders.
Clients value our experienced team and affordable rates.
Choosing us means certainty in every order.