What is MAX9814 Microphone Amplifier Module ? & How Does It Work?
Welcome, Developers & Engineers!We’re excited to have you here. This space is built for creators, problem-solvers, and tech enthusiasts like you. Whether you’re exploring projects, diving into code, or just visiting a site that speaks your language, you’re in the right place. In this blog, you will gain insightful knowledge of the MAX9814 Microphone Amplifier Module. Moreover, understanding the basics of the MAX9814 can greatly enhance your audio and sound-sensing projects. So, let’s get started.
What is MAX9814 Sensor Module?

The MAX9814 is a high-performance microphone amplifier module with automatic gain control (AGC) designed by Maxim Integrated. Consequently, it is widely used in electronics projects to capture clear audio signals from an electret microphone. This module features a built-in electret microphone, low-noise amplifier, and AGC circuitry. Therefore, it provides a clean analog output that is easy to interface with microcontrollers like Arduino, ESP32, or Raspberry Pi via an ADC pin. Additionally, it is perfect for sound level detection, voice recording, and audio-triggered applications.
Working Principles of MAX9814 Sensor Module?
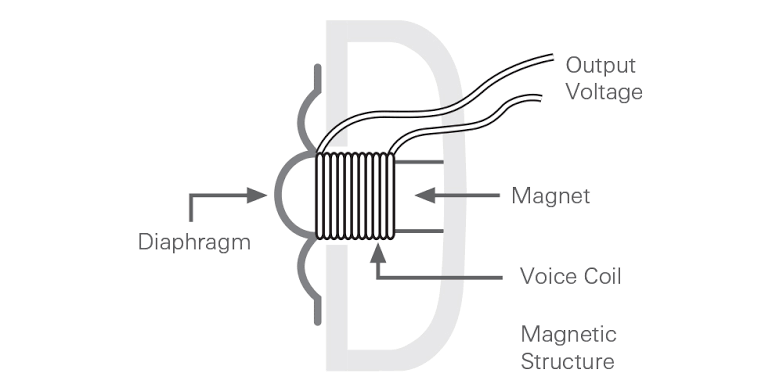
Microphone Operation: First, the onboard electret condenser microphone converts sound waves into a weak electrical signal. This signal is extremely small, so it needs amplification.
Amplification and AGC: Moreover, the MAX9814 amplifies this signal with a fixed 40dB gain in the first stage. As a result, the AGC circuit dynamically adjusts additional gain (up to 20dB more) based on the input signal strength. Consequently, quiet sounds get boosted more while loud sounds are compressed to prevent clipping.
Output Stage: In addition, the module provides a clean analog DC-coupled output that follows the audio waveform. Furthermore, an onboard attack/release time capacitor controls how quickly the AGC responds.
Overall Behavior: Therefore, the output remains relatively stable in amplitude even when input sound levels vary widely, making it ideal for sound detection without manual adjustments.
Hardware Overview of MAX9814 Sensor Module?
The MAX9814 module is a small breakout board that includes the MAX9814 IC, an electret microphone, gain selection jumper, and supporting components. The core is the 14-pin MAX9814 chip with integrated amplifier and AGC. As a result, modules typically have 5 pins for easy connection.
Supporting Circuitry: Additionally, a trimmer potentiometer (or jumper) allows selection of maximum AGC gain (40dB, 50dB, or 60dB). A capacitor sets AGC timing. Consequently, no external microphone or amplifier is needed – everything is onboard and ready to use.
Technical Specifications of MAX9814 Sensor Module?
- Function: Microphone amplifier with automatic gain control (AGC).
- Output: Analog DC-coupled signal (0V to VCC).
- Microphone Type: Built-in electret condenser.
- Fixed Gain: 40dB (first stage).
- AGC Gain: Programmable 0-20dB (total gain up to 60dB).
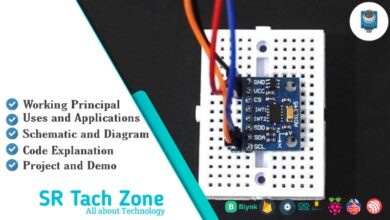
- Pinout: VCC, GND, OUT, GAIN, A/R.
- Frequency Response: 20 Hz – 20 kHz.
- Supply Voltage: 2.7V to 5.5V (commonly 5V or 3.3V).
- Current Consumption: ~3 mA.
- AGC Attack/Release Ratio: Approximately 1:4000 (fast attack, slow release).
- Output Drive: Capable of driving ADC inputs directly.
MAX9814 Sensor Module Pinout?
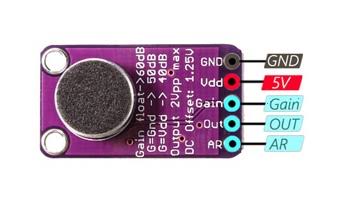
- VCC: Power supply (3.3V-5V)
- GND: Ground
- OUT: Analog audio output
- GAIN: Gain selection (connect to VCC for max gain, leave floating or use jumper)
- A/R (optional): Attack/Release timing capacitor connection
Basic Connections to Arduino:
- VCC: Connect to 5V or 3.3V on Arduino
- GND: Connect to Arduino GND
- OUT: Connect to analog pin (e.g., A0)
Real Life Uses and Applications of MAX9814 Sensor Module?
The MAX9814 is perfect for projects requiring reliable sound detection or basic audio input.
- Sound Level Meters: Measures ambient noise or clap detection.
- Voice-Activated Switches: Turns on lights or relays when someone speaks.
- Audio Visualizers: Drives LED strips that react to music or voice.
- Security Systems: Detects unusual sounds like glass breaking.
- Robot Sound Sensing: Enables robots to respond to claps or commands.
- Simple Voice Recorders: Provides clean input for audio sampling projects.
- Environmental Monitoring: Logs noise pollution levels.
Using MAX9814 Sensor Module with Arduino
In this part, we will learn how you can use MAX9814 with Arduino Uno, Nano, or Mega to read sound levels in just a few minutes – even if you’re a beginner.
What You Need:
- Any Arduino board (Uno recommended)
- MAX9814 Microphone Amplifier Module
- Jumper wires
- Breadboard (optional)
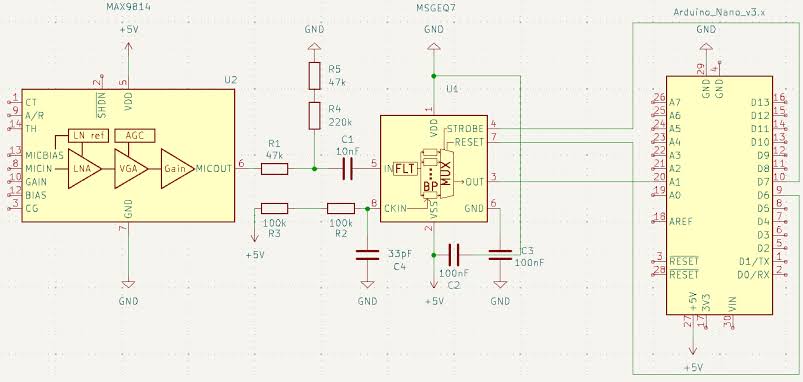
Wiring Diagram:
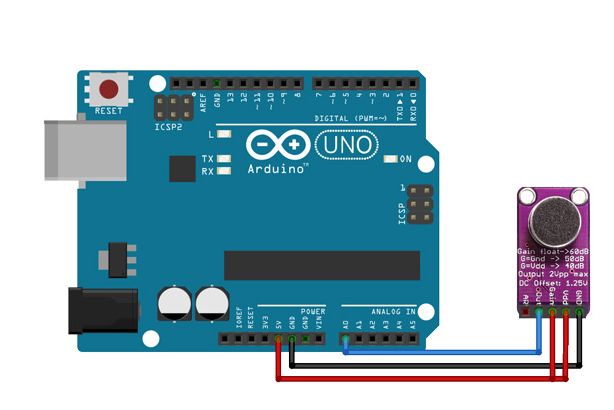
Connect directly – only three wires needed for basic operation.
Code:
No special library is required – just use analogRead(). Here’s a tested simple code – just copy-paste into your Arduino IDE.
#define MIC_PIN A0     // Connect OUT to analog pin A0

void setup() {
  Serial.begin(9600);
  Serial.println("MAX9814 Microphone Amplifier Ready!");
}

void loop() {
  int soundValue = analogRead(MIC_PIN);

  Serial.print("Sound Level: ");
  Serial.println(soundValue);

  // Optional: Map to a rough dB scale or trigger actions
  if (soundValue > 600) {  // Adjust threshold based on your environment
    Serial.println("Loud Sound Detected!");
  }

  delay(100);  // Fast sampling for responsive detection
}
Note: This is a basic example using standard Arduino functions – no external library needed.
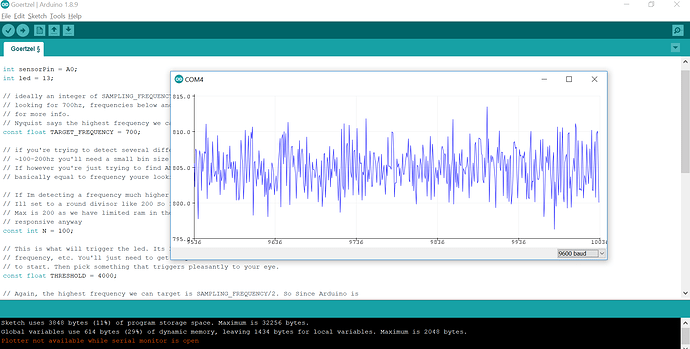
After uploading the code, open the Serial Monitor (Ctrl+Shift+M), set baud rate to 9600, and you’ll see raw analog values (0-1023) updating rapidly. Clap, speak, or play music near the microphone to see the values rise!
Note: The output is centered around VCC/2. For best results, set gain jumper to 40dB or 50dB for moderate environments. Moreover, shield from wind or breath noise for accurate readings.
Wrapping up
In this post, we’ve covered all the fundamental aspects of the MAX9814 Sensor Module. We trust that the information provided has been clear and insightful. Feel free to ask any questions you may have about this topic in the comment section below. We are here to help and provide additional clarification as needed.